Today, we’re diving into the new Home Assistant Voice Preview Edition hardware—a new voice assistant that is not like any other. It is privacy focused, customizable and designed specifically for the Home Assistant ecosystem. In this post, we’ll take a close look at the device, walkthrough the setup process with Home Assistant, and finish with some useful automations that you can use with the Home Assistant Voice.
Table of Contents
Overview of the device
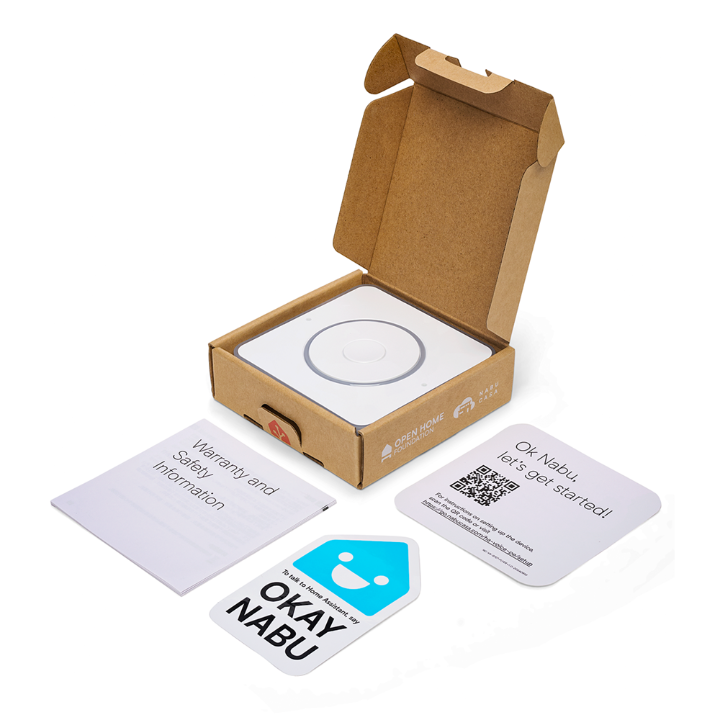
Besides the Voice PE, you get some warranty information, a quick start guide with a QR code for detailed setup instructions, and a cool ‘Okay Nabu’ sticker. However, the box doesn’t include a USB-C cable or a power adapter, so you’ll need to grab those separately.

Taking a closer look at the device, the top features 2 microphones, a dial, a button, and an LED ring surrounding it. The dial lets you adjust the volume and even customize the color of the LED ring. Pressing the center button can start or stop a conversation with the voice assistant. Beyond a single press, you can also use double, triple, and long presses to trigger automations, adding even more functionality to your setup.
On the front, you’ll find the speaker, which is pretty decent for voice interactions. On the right side, there’s a mute switch to manually turn off the microphones for privacy. Finally, on the back, you’ve got the USB-C port for powering the device, along with a 3.5mm headphone jack so you can connect it to an external speaker for even better sound quality.
Set up
Setting up the Voice PE with Home Assistant is straightforward, and you can do it directly from the Home Assistant mobile app. Just make sure that Home Assistant has location access enabled with precise location, or the device won’t connect.
First, power on the Home Assistant Voice PE. Once the LED ring starts with a twinkle animation, the device is ready to connect. Open the Home Assistant app on your mobile device, go to Settings > Devices & Services, and under the Discovered section, you will see the new device listed as Home Assistant-XXX Improv via BLE. Tap Add and you’ll be prompted to enter your Wi-Fi credentials for a 2.4 GHz network.
After entering your Wi-Fi details, tap Connect. You’ll then be asked to press the center button on the Voice PE to authorize the connection. Once that’s done, the device will connect to your Wi-Fi successfully, and you can tap Continue to move to the next step.
Next, a pop-up will appear asking if you’d like to set up ESPHome. Tap OK to proceed. The Home Assistant Voice will then be listed as a discovered ESPHome device. Select it and tap Submit. At this point, the setup wizard will check for any available updates for the Voice PE. If an update is found, it will automatically install it, ensuring your device is up to date.
By default, the Voice PE is set to use the wake word “Okay Nabu”, but you also have two other options to choose from. To change it, simply click on Change Wake Word, select your preferred option, and follow the prompts to say the wake word a few times to ensure that it works for you. Once that’s done, select the area where you plan to place the Home Assistant Voice PE, and then tap Next to continue.
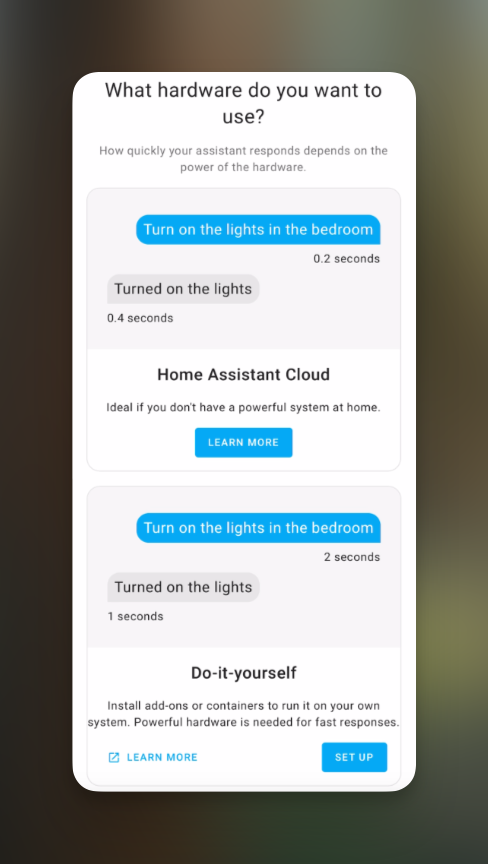
The following step is where you select the voice pipeline you want to use with the Voice Assistant. You can set up a local voice pipeline and process commands directly on your own hardware. Keep in mind, though, that response times will depend on your device’s specifications. If you’re using hardware like Home Assistant Green , or a Raspberry Pi , responses might take a few seconds. Alternatively, if you have a Home Assistant Cloud subscription, you can configure the voice assistant to offload commands to the Home Assistant Cloud servers for processing. This option significantly improves response speed, making it a great choice for smoother interactions.
Set up a local voice pipeline
If you’d like to set up a local pipeline, the setup wizard makes it simple by handling all the configuration for you. To proceed, tap Set Up under the Do-it-yourself option. The wizard will automatically install the Whisper add-on for speech-to-text, the Piper add-on for text-to-speech, and configure them with the Wyoming protocol integration. It will also create a new assistant using Whisper and Piper. Once the setup is complete, you can do some final tweaking like selecting the assistant’s voice. Personally, I recommend the hfc male voice—it sounds much more natural compared to the other options. After you’ve finished tweaking, tap Done, and the Voice PE will be ready to use.
Exposing entities to Voice Assist
After the setup is complete, the next step is to expose the entities you want to control using the Home Assistant Voice PE. To do this, go to Settings > Voice Assistants > Expose, and click on Expose Entities. A pop-up will appear showing all the entities from the devices you’ve set up in Home Assistant. Simply select the ones you’d like to expose to the voice assistant, and then click Expose Entities to confirm.
Use Home Assistant Cloud with Voice Assist
If you are already signed in to Home Assistant Cloud on your Home Assistant, the Cloud-based voice assistant is automatically set up under Voice Assistants. All we need to do is change the Voice PE assistant settings to use the Cloud option.
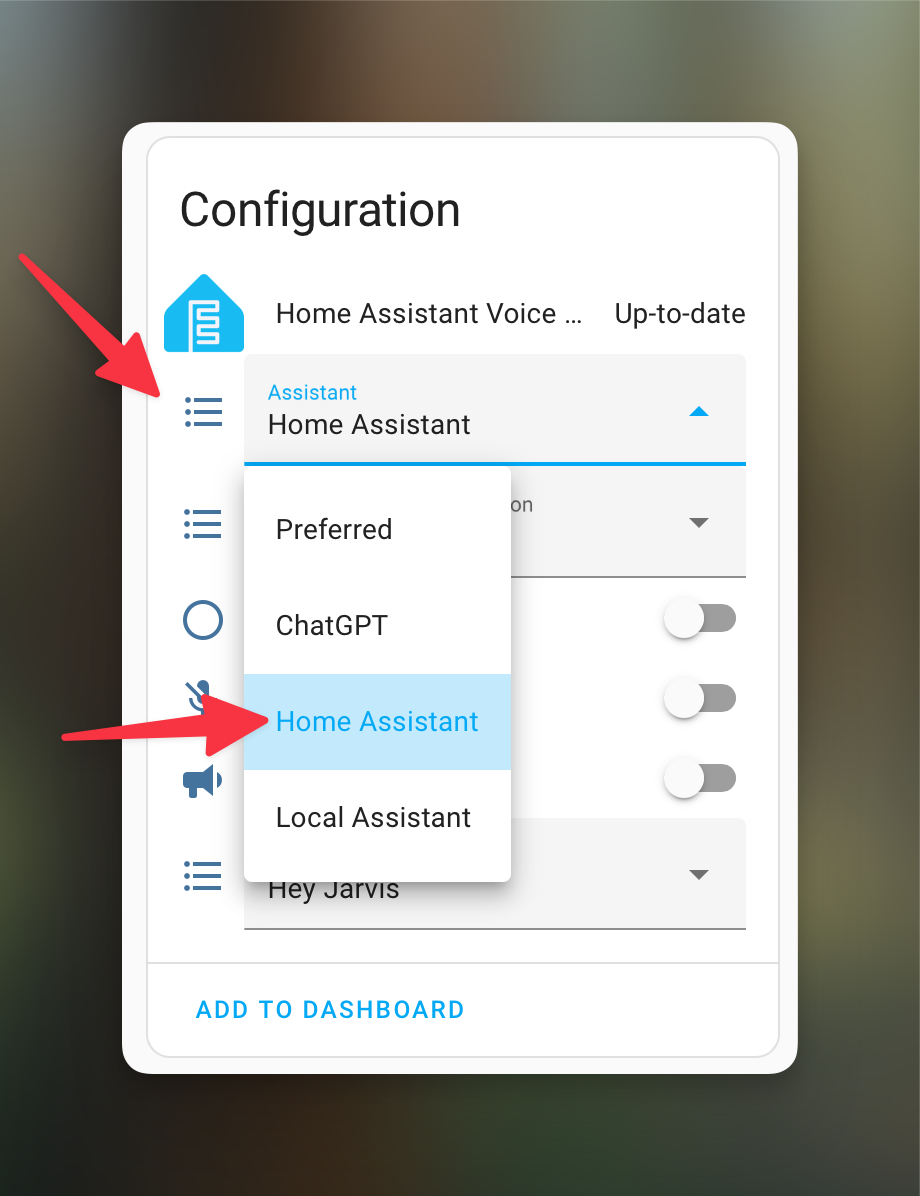
To do that, go to Settings > Devices & Services, click on Devices under ESPHome, and select the Home Assistant Voice device. On this page, you’ll see several entities that we can explore later. For now, scroll down to locate the Assist entity. Open the dropdown menu and select Home Assistant—this is the option for the Cloud service.
Available entities for the Voice PE
Let’s explore some of the entities available for the Home Assistant Voice PE. These entities allow you to control various features directly from Home Assistant, without needing to interact with the device itself. For instance, you can adjust the volume using the Media Player entity or mute the microphones with the Mute entity. There’s also an entity to toggle the Wake Sound on or off.
Additionally, the Wake Word entity makes it easy to change the wake word for your Home Assistant Voice PE. And as we saw earlier, the Assist entity lets you switch between different voice assistant pipelines.
Finally, there’s the Button Press Event entity, which you can use to create automations triggered by actions like double-pressing, triple-pressing, or long-pressing the center button on the Home Assistant Voice PE.
Setting up automations for the Voice PE
With all the entities available for the Home Assistant Voice PE, you can already imagine the range of automations you can create. While Home Assistant comes preloaded with a variety of phrases to trigger different actions, you can also craft custom sentences in automations to trigger actions specific to your needs. Let me show you a few simple automations I’ve set up with my Home Assistant Voice PE.
Voice PE Button actions
alias: Voice Assistant button actions
description: ""
triggers:
  - trigger: state
    entity_id:
      - event.home_assistant_voice_090168_button_press
conditions: []
actions:
  - choose:
      - conditions:
          - condition: state
            entity_id: event.home_assistant_voice_090168_button_press
            attribute: event_type
            state: double_press
        sequence:
          - action: light.toggle
            metadata: {}
            data: {}
            target:
              entity_id: light.ofc_juans_desk_light
      - conditions:
          - condition: state
            entity_id: event.home_assistant_voice_090168_button_press
            attribute: event_type
            state: triple_press
        sequence:
          - action: light.toggle
            metadata: {}
            data: {}
            target:
              entity_id: light.ofc_antonettes_desk_light
      - conditions:
          - condition: state
            entity_id: event.home_assistant_voice_090168_button_press
            attribute: event_type
            state: long_press
        sequence:
          - action: light.toggle
            metadata: {}
            data: {}
            target:
              entity_id: light.ofc_light
mode: single
This automation uses the Button Press Event entity. Here’s how the automation is set up:
For the Trigger, I used a State Trigger tied to the Button Press Event entity.
For the Action, I added a Choose Action with three options. Each option is based on a State Condition using the Button Press Event entity, with the Attribute set to Event Type.
Option 1: The state is set to double_press. The action toggles my desk light.
Option 2: The state is set to triple_press. The action toggles my wife’s desk light.
Option 3: The state is set to long_press. The action toggles the office light.
Weather forecast
Another automation I’ve set up is for the weather. By default, if you’ve exposed a weather entity to the Voice Assistant, you can ask for the current weather, and it will provide a simple response with the current temperature in your area. However, it doesn’t yet offer more detailed information or let you ask about the weather for tomorrow. Thankfully, we can fix that by creating an automation using the weather.get_forecasts action.
alias: Weather Forecast
description: ""
triggers:
  - trigger: conversation
    command:
      - What['s] [is] the [current] weather [right] [now]
    id: current_weather
  - trigger: conversation
    command: what['s] [is] the (forecast | weather) for {day}
conditions: []
actions:
  - choose:
      - conditions:
          - condition: trigger
            id:
              - current_weather
        sequence:
          - set_conversation_response: >
              It is currently {{ states('weather.tomorrow_io_home_daily') }}
              with a temperature of {{
              state_attr('weather.tomorrow_io_home_daily', 'temperature') }}°
              and a humidity of {{ state_attr('weather.tomorrow_io_home_daily',
              'humidity') }}%
      - conditions:
          - condition: template
            value_template: "{{ trigger.slots.day == 'today' }}"
        sequence:
          - action: weather.get_forecasts
            metadata: {}
            data:
              type: daily
            response_variable: forecast_data
            target:
              entity_id:
                - weather.tomorrow_io_home_daily
          - set_conversation_response: >-
              {% set forecast =
              forecast_data['weather.tomorrow_io_home_daily'].forecast[0] %}

              The forecast for today is {{ forecast.condition }} with a high
              temperature of {{ forecast.temperature }}° and a low of {{
              forecast.templow }}°. The probability for precipitation is {{
              forecast.precipitation_probability }}%
      - conditions:
          - condition: template
            value_template: "{{ trigger.slots.day == 'tomorrow' }}"
        sequence:
          - action: weather.get_forecasts
            metadata: {}
            data:
              type: daily
            response_variable: forecast_data
            target:
              entity_id:
                - weather.tomorrow_io_home_daily
          - set_conversation_response: >-
              {% set forecast =
              forecast_data['weather.tomorrow_io_home_daily'].forecast[1] %}

              The forecast for tomorrow is {{ forecast.condition }} with a high
              temperature of {{ forecast.temperature }}° and a low of {{
              forecast.templow }}°. The probability for precipitation is {{
              forecast.precipitation_probability }}%
    enabled: true
mode: single
I won’t go into full detail on how this automation is set up. However, I do plan to cover the weather.get_forecasts automation in detail in a separate blog post.
Here’s how the automation is set up:
Triggers:
Trigger 1: Responds to a sentence asking for the current weather. I’ve added a Trigger ID for use in the actions.
Trigger 2: Responds to sentences asking for the weather for today or tomorrow, using a wildcard to capture either “today” or “tomorrow.”
Actions The automation uses a Choose action with three options:
Option 1:
Condition: Checks if the trigger matches the Trigger ID from Trigger 1.
Action: Uses a Set Conversation Response action to provide the current weather conditions, temperature, and humidity.
Option 2:
Condition: A template condition that triggers when the wildcard contains the word “today.”
Actions:
Runs the Weather Get Forecasts action to fetch weather details for today, stores the data in a variable, and uses it in the next action.
A Set Conversation Response action that provides the day’s weather conditions, high and low temperatures, humidity, and precipitation probability.
Option 3:
Condition: Similar to Option 2 but triggers when the wildcard contains the word “tomorrow.”
Actions:
Fetches the weather forecast for the next day using the same Weather Get Forecasts action.
Sets a conversation response that provides the same details for tomorrow.
Announce messages
If you have multiple Home Assistant Voice devices around your home, you can use them to send custom messages from one device to another in different areas of your home.
alias: Announce message
description: ""
triggers:
  - trigger: conversation
    command:
      - (announce | broadcast) in the {area} the following message {message}
conditions: []
actions:
  - action: assist_satellite.announce
    metadata: {}
    data:
      message: "{{ trigger.slots.message }}"
    target:
      area_id: "{{ trigger.slots.area | replace(' ', '_') }}"
mode: single
I’m sure that this type of functionality will be officially implemented in future updates, eliminating the need for a custom automation. But for now, here’s how I set it up:
Trigger: I created a Sentence Trigger that responds to a command asking to announce or broadcast a message to a specific area. This includes two wildcards:
{message}: Captures the content of the message to be broadcast.
{area}: Captures the name of the area where the message should be sent.
Action: I used the Assist Satellite Announce action to handle the broadcast.
For the message, I used the template: "{{ trigger.slots.message }}"
For the target area, I set it to: "{{ trigger.slots.area | replace(' ', '_') }}". This ensures that the message is sent to the appropriate area. The replace filter converts spaces in area names (e.g., “Living Room”) into underscores (e.g., “Living_Room”), otherwise, the automation won’t work.
So, what do you think about the new Home Assistant Voice PE? If you’re interested in getting one, You can get one here .
Support
As a solo creator, I dedicate my free time to maintaining this site. If you find my content useful, consider supporting the blog—every contribution helps keep the content coming.
Buy me a coffee